Since I'm both happy with my bikes and have no room for anything additional, I've decided to have some fun with the next bike for my [recently-turned] 4yo. He's been riding an Isla CNOC 14, which is great, but having gears is a complete game changer on our hilly roads.
This project wasn't really something I was looking for, but someone down the street decided to throw away a Scott Scale 20 kids bike ... and so I had no choice but to pull it out of the trash.

Anything steel has rusted out. The fork is terrible (and putting a fork on a kids bike is ridiculous). And it must weigh 30lbs. But the frame seems decent. The specs are standard (seat tube, head tube, BB). We can fix this.
The plans for this project:
- Convert to disc brakes to maximize stopping power with least amount of hand force.
- Wide range gears for MTB (and our neighborhood hills)
- Lighten it up! -- Adding disc brakes will add weight, but we should be able to save some significant weight on the build.
- Personalize it. My second son is always getting hand-me-downs, so the goal is to make an exception. We're going with a Thor theme here, since that's my son's favorite superhero.
Frame Modifications
The first step in the project was just stripping it down to the frame. Any parts that seem viable we'd donate to a local bike charity; the frame is all I really planned to use. As it turns out, we kept a few of the components, but most were unable to be salvaged.The unmodified frame weighed in at 1588g (3.5lbs), which is not very light (it weighs almost as much as my 59cm titanium gravel frame), but it seems nicely built and it'll weigh a little less when we're done with it.
After stripping off the components, my friend Kurt helped me finish what I started with a Dremel; we ground off the brake bosses (we're going disc brakes here, so those are useless) and kickstand plate.
Sorry, kids; no, you can't have a kickstand on your bike.
 |
| Showed those brake bosses who's the boss. |
 |
| Removed kickstand plate. |
Kurt also helped me with installing the A2Z DM-UNI adapter -- the key to turning this into a disc-brake bike. This time we modified the adapter a bit to make it a little easier to take wheel on/off. We used the existing fender eyelets to fasten the adapter onto the frame. This turned out really tidy.


Frame Finish
Painting
My original plan was to paint this myself using Montana cans. I figured the total cost of doing that would be around $70 (including frame stripper, necessary supplies, etc.). So not exactly cheap, but cheaper than powdercoat. I started by using a can of aircraft stripper I already had on hand to remove the existing paint. This is nasty stuff. |
| Covered in aircraft stripper. Too bad it's not a scratch-n-sniff photo. |
Sadly, the guy that painted my previous bike-project frame is no longer in business, so I had to shop around a bit. Ended up taking this to ASCO; they were super nice, did the work right on schedule, and ended up giving a lower price than originally quoted once they saw in person both the (small) size of the frame and the amount of work I'd already (needlessly) done in stripping it down. They did a great job masking everything off, etc. It turned out fantastic!
 |
| Gold! |

Decals
Since the goal is to make this bike more personalized, I opted not to look for Scott decals, and instead headed over to doityourselflettering.com to get an appropriate Thor-related sticker. I chose silver for the decals, and spec'd the reflective vinyl lettering for added low-light visibility.
 |
| Reflective decals. |
Fork
For the fork, there are actually more options with 20" (thanks to folding bikes) than for 24". I found a few carbon options, but chose one that had the largest axle-to-crown measurements so it wouldn't mess up the geometry of the bike too much. (Though I'm not sure how much the original frame was designed around the suspension fork axle-to-crown.) This is definitely shorter than the original suspension fork, but I think it ends up looking a lot more normal geometry than the original fork. The fork has brake bosses for v-brake and disc-brake post mount. I just used brake boss plugs to fill in the holes in the front. (I actually have some cosplay EVA foam sample squares that I might use to make spikes to fill these holes, but I haven't done that yet.)

Wheels
20" Wheels: Paired Spoke Lacing
The stock wheels on this bike are the standard 20" (406 ETRTO) size, I ordered a set of Spank Spoon 28 rims in 32h drilling, since I found these on sale. I would have much preferred to find 24h drilling, as 32h is way overkill for a wheel this size and rider this tiny, but as this is a bmx wheel size, it is very difficult to find anything less than 32h -- and even 32h is far less common than 36h.
But, to solve this problem, I decided to go with 32h rims and hubs and just use half as many spokes, since 16 is also a nice divisible-by-4 number. The only challenge using half as many spokes presents is lacing and what to do with the extra holes. More on that in a bit.
For the hubs, BDOP has been having a sale on some old stock Novatec hubs. For this frame I need 130mm rear spacing and disc hubs; that's a bit of a unicorn now that the standard settled on 135 OLD for disc, so it is lucky that the D352 hub was available in that clearance bin. For front I got the excellent, but discontinued, D711 QR hub. I really like Novatec hubs, so picking these up for $80, per set (with Japanese bearings) was a great deal. I bought 2 sets ... more on that later.
In order to ensure that I wasn't lacing spokes from one side of hub to holes angled for the other side of the hub, I opted for a paired-spoke lacing. I was inspired by -- and followed the directions -- described here:
http://faqload.com/faqs/bicycle-components/wheels-and-tyres/paired-spoke-lacing
(There is actually a nds/ds-reversed mistake in the lacing instructions; I need to email the author to suggest correcting it.)
I used Sapim Laser spokes. Those spokes can be cut as short as 175mm, which worked for this build (I think my shortest length was 177mm).
To fill in the holes (to keep out dirt, water, etc.) I used 5mm plastic plugs for furniture, etc. This idea was also not original, I read about it first here:
http://forums.mtbr.com/fat-bikes/filling-those-unused-spoke-holes-rims-860362.html
 |
| A little out of focus, sorry. |
 |
| Novatec D352 hubs are 130mm OLD, which is otherwise hard to find now. |
 |
| (This wheel has not been tensioned yet.) |
 |
| Gold nipples! |
 |
| Using furniture plugs to fill the extra holes. |
The hubs are light, but the rims, being BMX rims aren't the lightest. 1244g isn't terrible for a wheelset, but I suspect with a little patience, shopping and expanded budget this could drop a couple hundred grams.


16" Wheels: Some Ideas Prove to be Bad Ideas
To make this frame last longer, I had what felt like a clever idea to build it with 2 weelsets: The 20" (406) for which the frame is designed, and also a set of 16" -- though I went with the 349 ETRTO size, typically used on recumbents -- not the more-common 16" BMX (305 ETRTO). Sizing up a bit, since I don't need them that small -- and hopefully these will look less out-of-place in the frame. We shall see. (Spoiler alert: this was a dumb idea, but the build was still interesting.)Because of how the holes are offset on one side of the hub vs. the other, using every other hole is actually less trivial than it sounds. It requires 3 spoke lengths. I chose the NDS as the side that would get the uncompensated length and then for the DS I adjusted the cross "factor" by 0.125 (i.e. I used a 1.0-0.125x for one set of spokes and 1.0+0.125x for the other). I thought I had a paper-napkin sketch that made this make sense, but I think maybe the correct adjustment would have been 0.25. If the wheels were for me, I probably would have replaced them as half of the DS spokes might not really be long enough, but since it's for a 40lb kid, I'm not going to worry about it.
I played around with the lacing a bit -- usually alternating sides, but since this is 1x lacing, you can also do either all heads-in or heads-out. I did the front DS heads-out, for no particular reason. (Mostly just with such tiny rims, I didn't see any reason to move the spokes further outboard, since the bracing angle is already pretty extreme.)
These are straight-gauge (2.0mm) titanium spokes in gold. Red Sapim Polyax aluminum nipples. I used motor oil as lubricant, as usual, but wondered if ti spokes might need anti-seize. Too late! They're properly tensioned, though, so I don't expect to ever need to adjust them.
The spoke sizes made this a fun project. Too bad I failed to get the math right; I clearly need to dust off my trigonometry.


Lesson Learned: See the Forest for the Trees
So, these wheels built up fine, but in the end they dropped the bike too much to be usable (pedals would hit the ground with even a minor-leaning turn). I should have considered that more thoroughly. The 140mm crank arms I'm using are about the shortest I can find, and there's even pedal strike risk with the normal 20" wheels (though right now the rear tire is a smaller 1.6" tire).Brakes & Drivetrain
For the brakes, I ended up finding a set of Shimano BR-M395 (Acera) hydraulic brakes with new pads for $40. While the levers aren't the same single/double-finger design as the fancier (and newer) Shimano levers, the levers do have reach adjust -- and I find my older son is still reluctant to use less than two fingers for braking even with the newer lever designs. So I didn't really take that into consideration.
For the drivetrain, I decided to go a little experimental. I figured grip shift still makes sense for him, if the actuation is light enough. Finding a 10sp SRAM grip shift at an affordable price is pretty tricky (but 11-speed is no problem!). While 11-speed is always tempting, I decided to go with a SRAM 9-speed setup. I found a lightly-used 11-34t 9-speed XTR cassette, which seemed very sane, and a SRAM X0 grip shifter. Problem is there aren't any 9-speed clutch rear derailleurs; however, Shimano 10-speed and SRAM 9-speed both use [almost the] same pull ratio (1.1:1 vs 1:1) and many people successfully use a Shimano 10-speed rear derailleur with SRAM 9speed levers. I found a short-cage Shimano Zee (the Free-Ride edition supports 36t). Done & done.
For the crankset, I went back to Trailcraft and got their direct-mount cranks in 140mm size with a tiny 28t cog. With the 11-34t cassette that should be a big range with plenty of easy gears for those little legs. I love that Trailcraft sell their components for folks like me that are building up or converting other bikes.

Cockpit
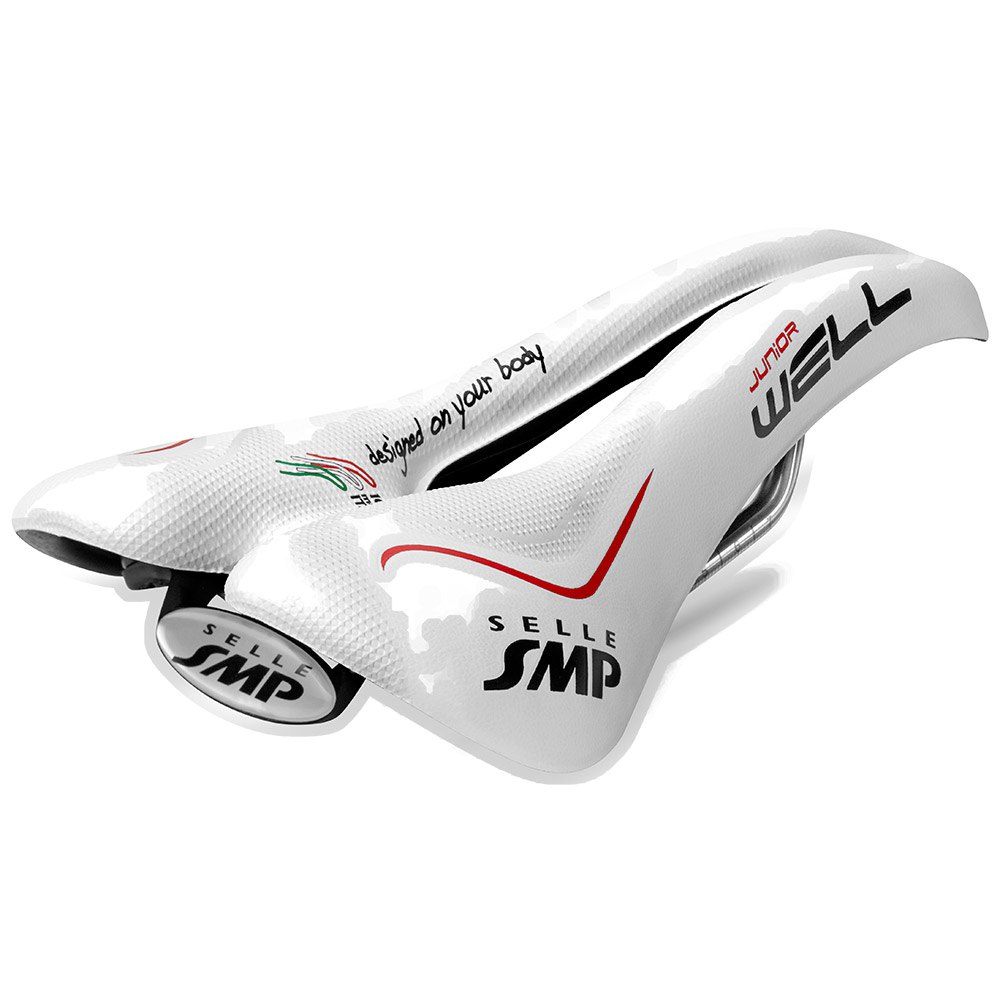
For the handlebars, I picked up some inexpensive carbon MTB bars from China. For my own mountain bike, I probably would be a little more conservative, but I don't weigh 40lbs like my son does. I cut these (way) down for his narrow shoulders.For the saddle, I got a Junior Well saddle; I found this on sale for around the same price as other kids saddle options; it weighs a reasonable (and lighter-than-alternatives) 225g and the SMP "eagle beak" nose helps keep shorts from getting snagged. Plus the red fits our color scheme.
Final Result
All built up, the bike is fantastic. It works great, looks great, and my son absolutely loves it. It's still too big, but he can make the tips of his feet touch the ground, so it's the only bike he'll ride now. He can climb any hill sitting down now -- which is both good and bad since I need him to get more comfortable getting out of the saddle.

 |
| I opted for BMX tires on this bike, which should be superior on-road and just fine off-road (since we're not riding muddy trails anyway). |

 |
| Found a dragon head badge on eBay. |
 |
| Brakes dialed in all the way works great for 4yo fingers. XO shifter is easy to twist. |
 |
| Zee rear derailleur pairs nicely w/ SRAM 9sp. |
 |
| Zipp road skewers (this is 130 OLD) and rainbow bolts! (My son always pointed out how much he liked these on my wheels.) |
 |
| The new Trailcraft DM crankset is very nice. |

No comments:
Post a Comment